

Widgets
Overview
The Widgets section of Recommendations is where you are able to build and configure the widgets that will appear in the Recommendation zones on your site. In this section you will be able to change the layout, edit styling, select and modify strategies and manipulate which items the engine is recommending.
Navigating to the Widget Home Page
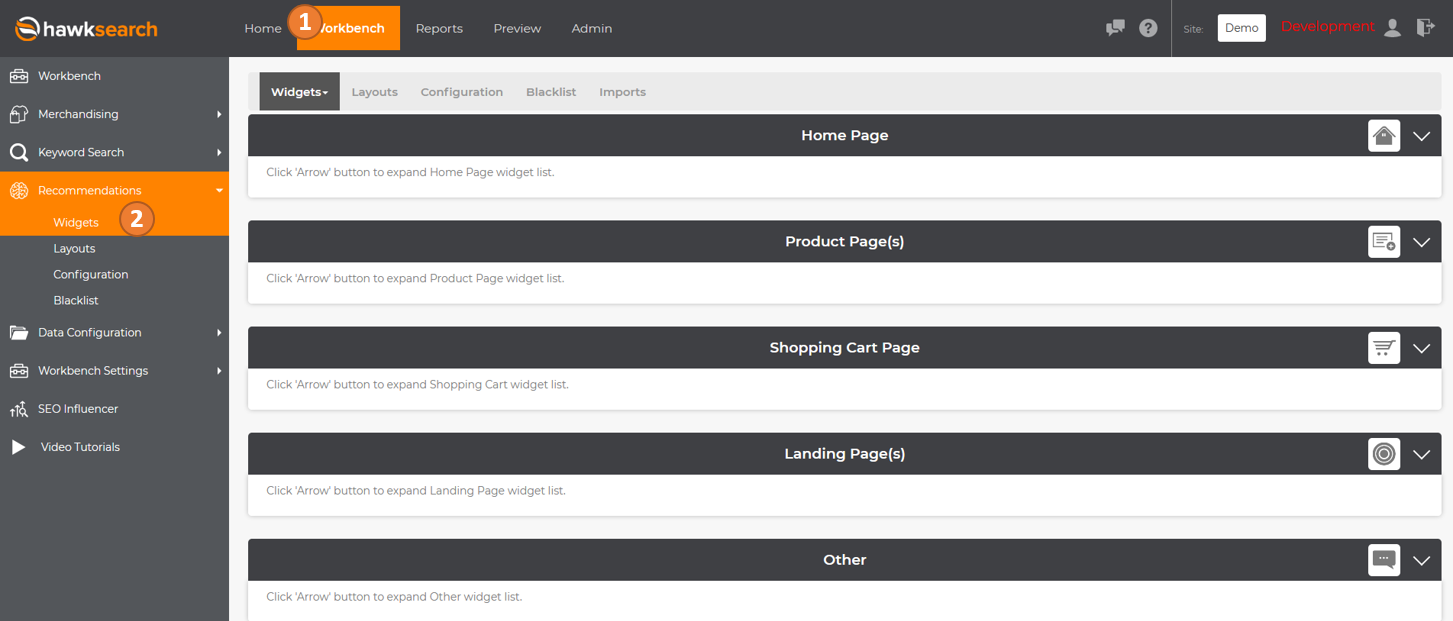
This page gives you an overview of all the widgets currently set up within the workbench. The widgets are organized by where the Recommendation Zones appear within the site. You can choose from Home Page, Product Page, Shopping Cart Page, Landing Page(s), and Other. Once the widget is fully configured, the corresponding div will still need to be placed on the appropriate pages on the front-end, but the administration tool allows you to easily keep track of and organize these widgets based on where they will appear.
-
Select "Workbench" from top Navigation.
-
Select "Recommendations" from Left Navigation and choose "Widgets" from the list of subcategories.
Adding/Editing a Widget

You will need to click the + sign next to the page to view all available widgets on that page.
-
You can edit a widget using the "Pencil" icon, copy a widget using the "Paper" icon or delete a widget using the "Trash Can" icon. Hovering over the "?" icon will show when the widget was created and when it was last modified.
-
To add a new widget, click "Add new."
Adding a New Recommendation Widget
-
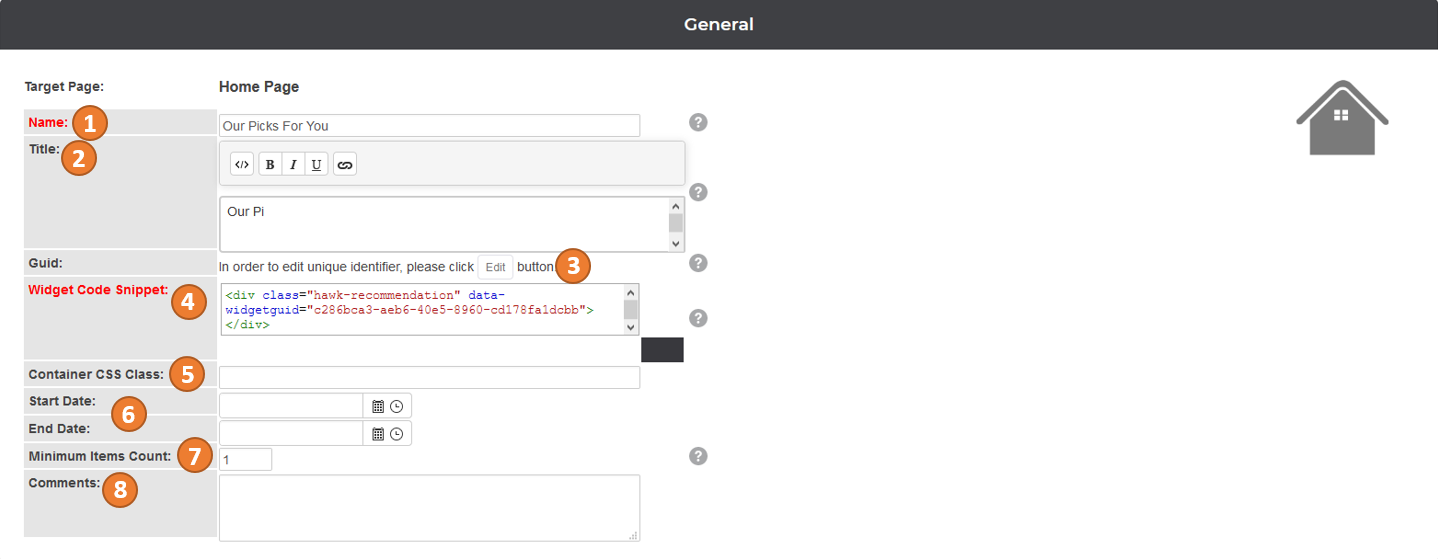
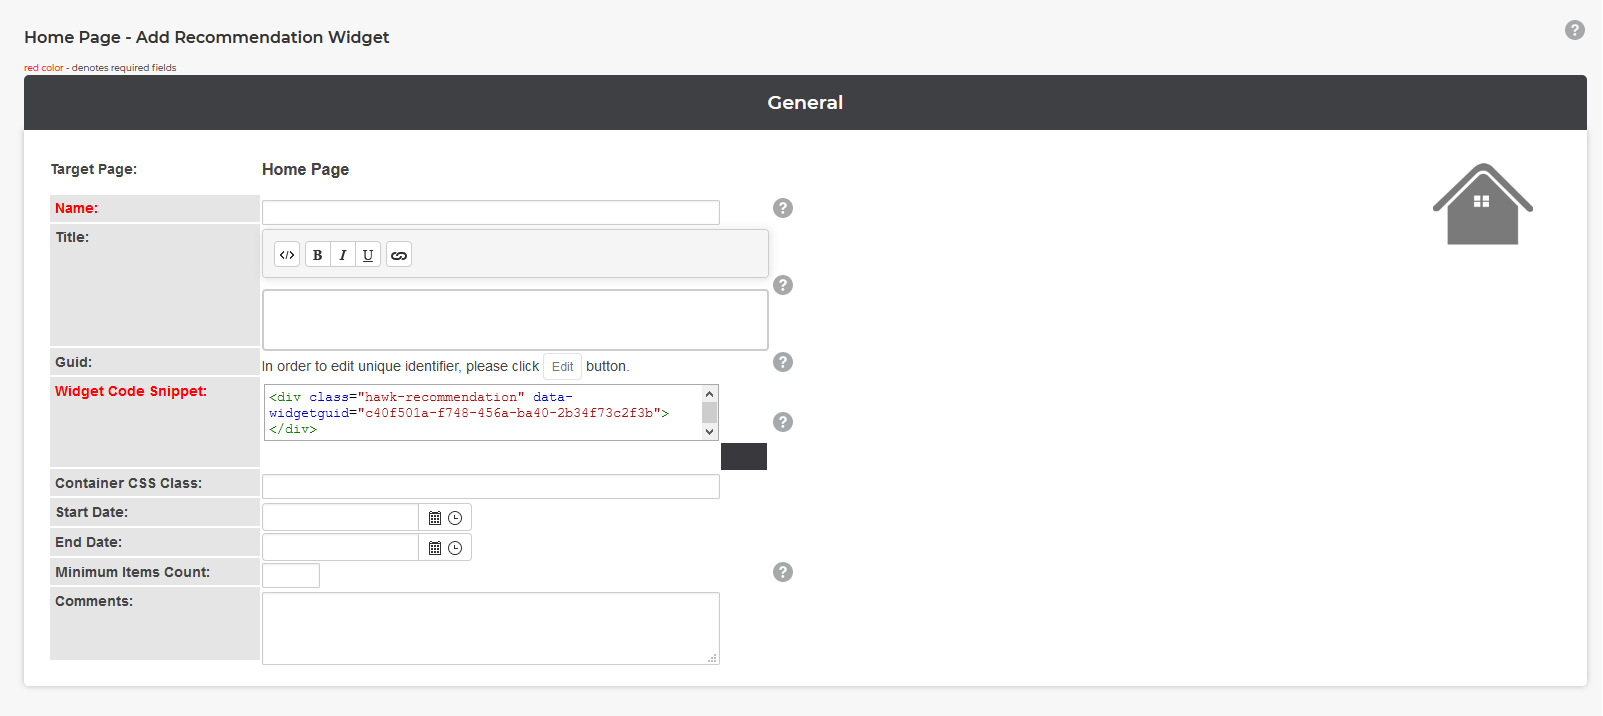
Create a name for the Widget. This is the name that will display within the Hawksearch Workbench.
-
Add a Title for the widget. This is the Title that will appear above the widget on site end.
-
Edit the unique identifier GUID of the widget by clicking on the "Edit" button. Each Widget you create will have its own GUID used in the div. When setting up new widgets in Manage, after testing in staging, you may wish to keep the GUID consistent between corresponding Widgets between environment for coding purposes. This feature gives you the option to edit the GUID to match its counterpart in the opposite environment.
-
The Widget Code Snippet is div that needs to be placed on the page where the widget should appear in order to render the corresponding Recommendation Zone.
-
The Container CSS Class field gives you the option to append a wrapper that will allow you to control the CSS of the widget.
-
Select dates when the widget will stop and start appearing by selecting a Start and End date using the calendar and clock buttons. Note that if no date is specified, the widget will continue to render as long as the div is in place until the widget is deleted or modified.
-
When configuring a recommendation widget, the minimum number of items that need to be met for this widget to be displayed can be set. If the number of qualifying items is less than this number, the widget will not display.
-
Use the Comments section to make notes about the widget for internal reference.
Widget Layout
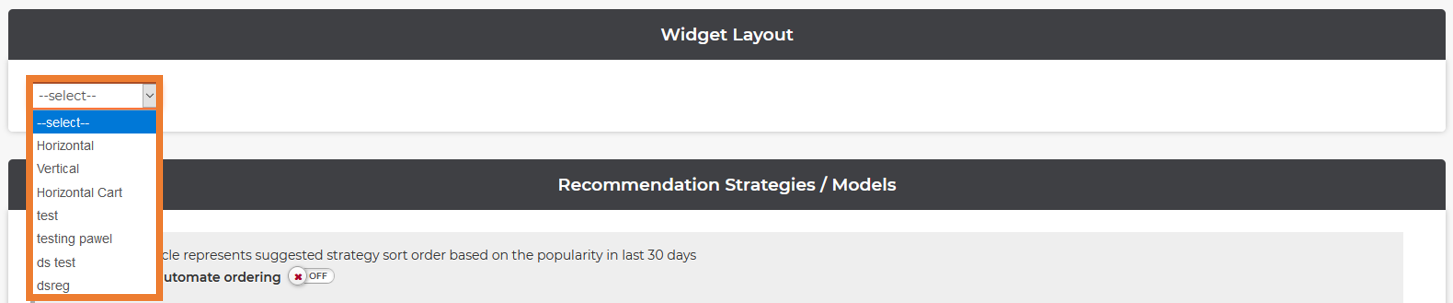
Make a selection from the existing layouts from the drop down menu. These layouts can be created and edited in the Layout section of the Recommendation feature in the workbench or by toggling to the "Layouts" tab at the top of the screen.
Editing the Layout of a Widget

-
Specify the "Number of Items" you wish to return in the Recommendation widget.
-
Select whether you would like the widget to display Horizontally across the page or vertically up and down the page.
-
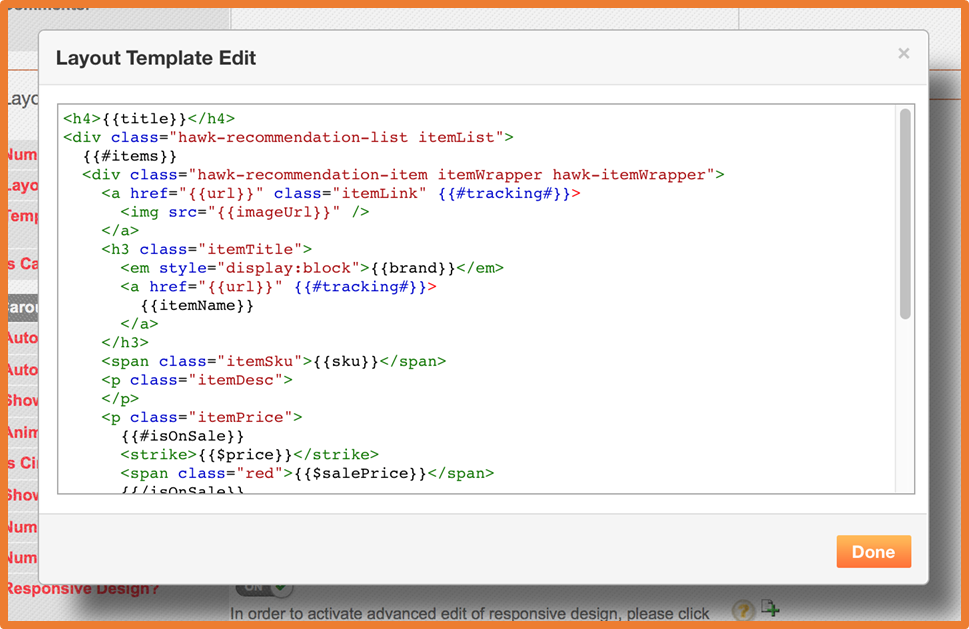
Your developers have complete control of the styling of the widget and can edit HTML directly in the tool using this feature.
-
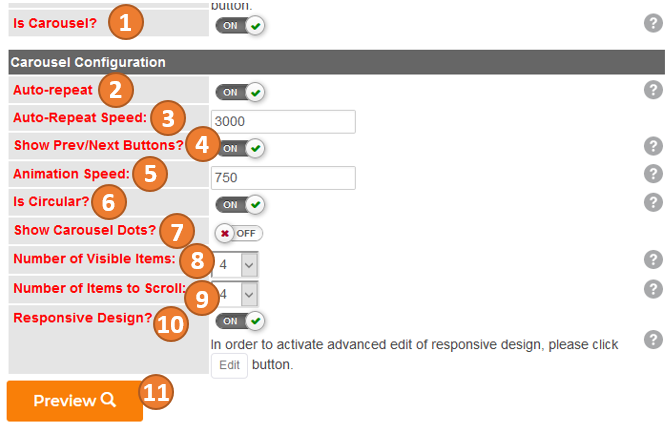
The "Is Carousel" feature allows the user to scroll through products with in the widget beyond the initial products that fit within the size of the zone. Enabling the Carousel will allow you to further customize the display.
-
Preview will allow you to view what the widget will look like based on the current configuration without saving.
Edit Carousel Features
-
The "Is Carousel" feature allows the user to scroll through products with in the widget beyond the initial products that fit within the size of the zone. Turning Carousel on will allow you to make further customizations to the display.
-
When "Auto-repeat" is on, the widget will automatically rotate through the available products within a Recommendation widget.
-
Enabling "Auto-repeat" will allow you to adjust the "Auto-Repeat Speed". This determines how often the images will rotate. The close to zero, the quicker those products will rotate.
-
Enabling the "Show Prev/Next Buttons" will display arrows on either side of the widget indicating that the widget is a carousel.
-
The "Animation Speed" determines how quickly the carousel moves when rotating from one product to the next. The closer to zero, the faster these items will move.
-
When "Is Circular?" is enabled, once the last product in the widget is viewed, it will return to the beginning of the rotation.
-
"Show Carousel Dots" will appear at the bottom of the widget to indicate how many different views of products there are within the widget.
-
When the carousel is at rest, "Number of Visible Items" is the number of recommended products that will display.
-
You can specify the number of items that should be rotated through on one rotation. Ex. If 4 products are displayed in the widget and "Number of Items to Scroll" is 4, when a user clicks "Next" all 4 items will be new (assuming that there are 8 or more products to display in the widget).
-
Enabling "Responsive Design" will allow you to edit the breaking points for the widget in the responsive design.
-
Clicking the "Preview" button allows you to visually preview what the layout of your widget will look like without having to save changes.
Recommendation Strategies/Models
-
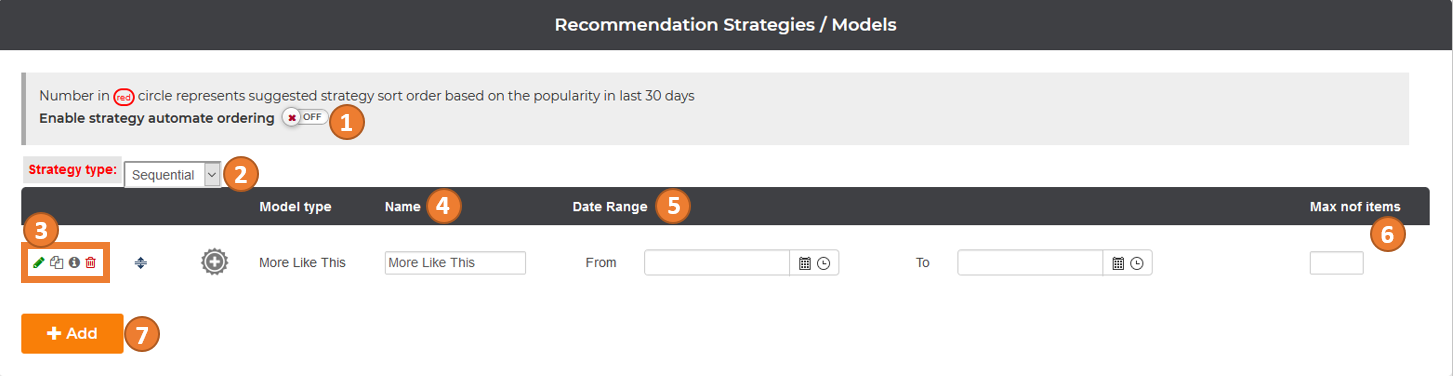
Enabling "Strategy Automate Ordering" will display products pulled from the most popular strategies (over the last 30 days) first within the recommendation zone.
-
You can choose from two different "Strategy types". The first, "Sequential" will display products based on the order of the strategies configured in the next section taking into account the maximum number of items per strategy that has been specified and assuming there are enough products to match the criteria specified within the strategy. "A/B Testing" randomly returns strategies to help determine which strategies are most successful. The red, circled numbers will indicate the ranking of the popularity each strategy. You can then use the Sequential "Strategy type" to indicate which strategies should have priority.
-
To edit a Strategy, click on the "Pencil" icon. To copy a Strategy, click on the "Copy" icon. To delete a Strategy, click on the "Trash Can" icon. To change the order of strategies, click on the "Double Arrow" icon and drag the strategy to its desired position on the list.
-
Rename your Strategy by and typing directly into the text box under "Name" column.
-
Use the "From" and "To" calendar and time selections to specify when the strategy should be enabled. Note that if no dates are specified the strategy will take effect immediately and remain in place until the strategy is edited or deleted.
-
"Max nof items" determines the maximum number of items that can be returned for each strategy within the widget. If no number is specified, the engine will fill the widget with all the possible matches and move on to the next strategy if there are still remaining slots to be filled.
-
To add a new Strategy, click the orange "Add" button.
Adding a Strategy
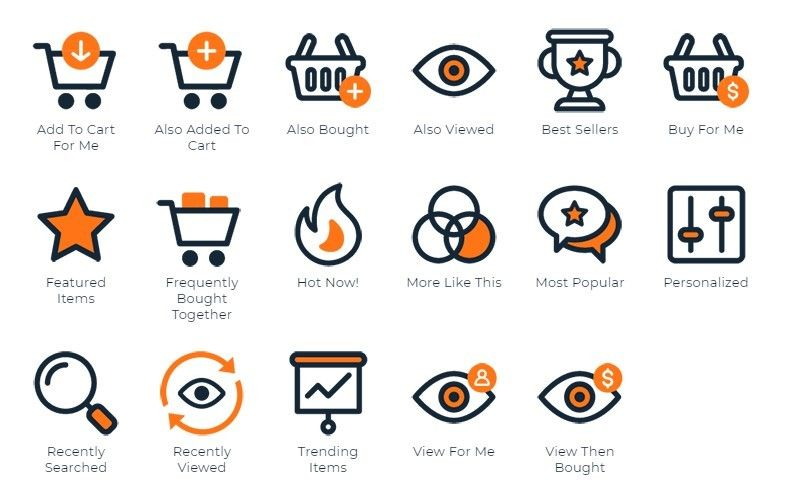
When you choose to add a new strategy, you will be prompted to make a selection from 13 different strategies that will define which items will be displayed within the widget. Once you select a strategy, you will be directed to the "General" tab within the configuration.
Most recommendation strategies share the following configuration options:
View Context
The View Context determines which product or user activity HawkSearch uses as the basis for generating recommendations. Available options vary by strategy and may include:
- Page Context - returns items based on the product ID currently showing on the page.
- Last Viewed - populates the widget with products that match the most recent product page viewed.
- Last Added to Cart - will select products based on the last item added to cart.
- Last Purchased - returns products that =match the last item purchased.
Filters
Use filters to limit the products returned by the strategy.
- Choose whether ANY or ALL conditions must be met.
- Click Add Condition.
- Select a field, operator, and value.
- Use tokens when you want a field to match the selected View Context (for example, Brand equals Brand).
- Create nested conditions using the > icon.
- Remove conditions using the - icon.
Previewing a Strategy
Select Preview to view the products that would be returned based on the current configuration.
Saving Changes
- Select Done to save changes.
- Select Back to return to the strategy list.
- Select Cancel to discard changes.
For more information regarding how each strategy operates, please see Strategies Overview.
Filtering Recommendations and Defining Default Values
When a strategy utilizes fields to filter and return products, it is recommended you define default values in the event that there are not enough or no products that match the specified criteria. For example, if you have configured a More Like This strategy that will return items that match the brand on the current product page, there is a chance that the current product being viewed is the only product of that brand. In this case, the strategy will not return any products unless a default value is specified.
When filtering recommended items based on fields the engine follows the following process in order to fulfill these specifications:
-
The engine is able to match the value in "Hawksearch.Context object" set via JavaScript
-
The value doesn't exist in "Hawksearch.Context object," but the unique ID of the item is provided. The engine searches for this items in the index, finds the corresponding field value that it is looking for and uses the query responses to return products to populate the strategy. NOTE that because of this, if the Field in question is not stored in the index, the engine will not be able to return products.
-
If neither of these are successful, the value from the default field specified within the strategy in the workbench is assigned.
-
If previous value is empty, the engine will look to the value specified in the corresponding field configuration. To learn more see Fields.
-
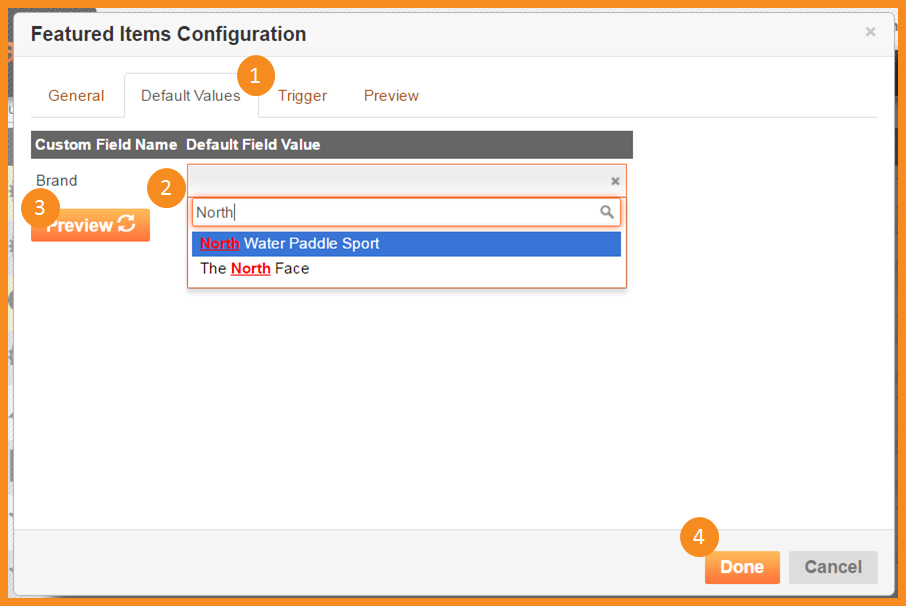
To assign a default value for a field within a strategy click on the "Default" tab of the strategy in questions.
-
Start typing the desired value into the corresponding field and make a selection from the auto-complete.
-
To preview how this affects the most recent user action, click "Preview."
-
To return to the Widget click "Done"
Defining a Trigger
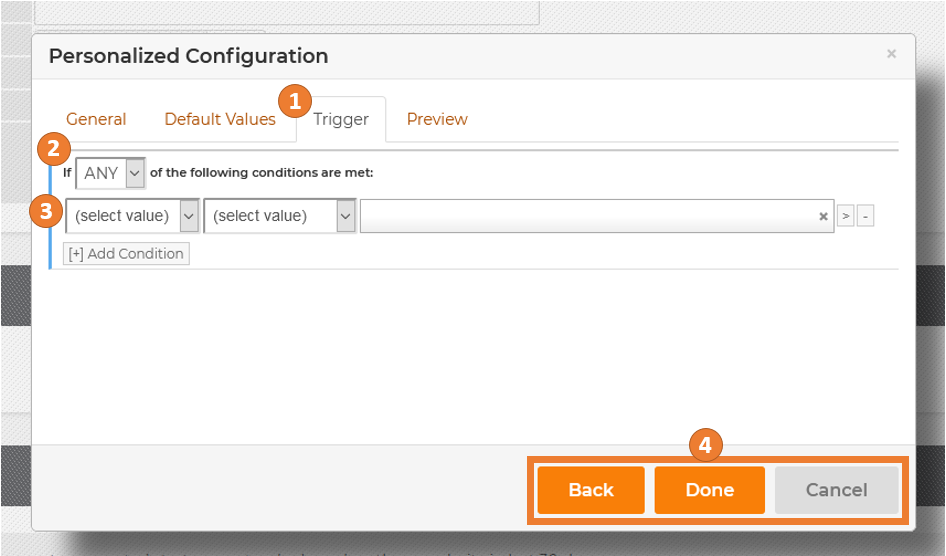
-
To navigate to the Trigger page, use the trigger tab at the top of the strategy pop-out window.
-
Select whether ANY or ALL of the conditions must apply to the trigger for the strategy.
-
Choose the context that will trigger this Strategy. You can choose to trigger the strategy based on visitor targets, landing pages or using a custom request to Hawk.
-
To save changes, click "Done." To exit the window without saving, click "Cancel."
Previewing Strategies
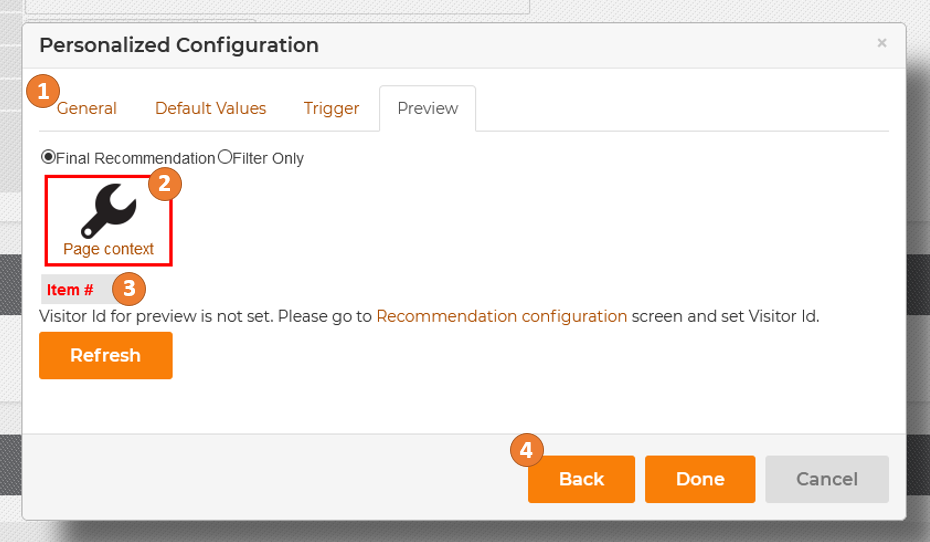
This section within the strategy configuration pop-out window allows you to preview the items that will be recommended using the current strategy. These recommendations are based on your useaction on the URL provided in the window.
-
The Final Recommendation radio button will display products taking both the custom filters and the inherent logic of the strategy. Using the Filter radio button will return any items that match the filter.
-
Toggle between the available View Context available for the strategy by clicking the different icons.
-
The Item # indicates the item that the engine is recommending products for and will correspond to the View Context
-
The preview will only show the top 30 items returned. In the case there are more than 30, the text will indicate how many items match the given parameters.
Saving Changes
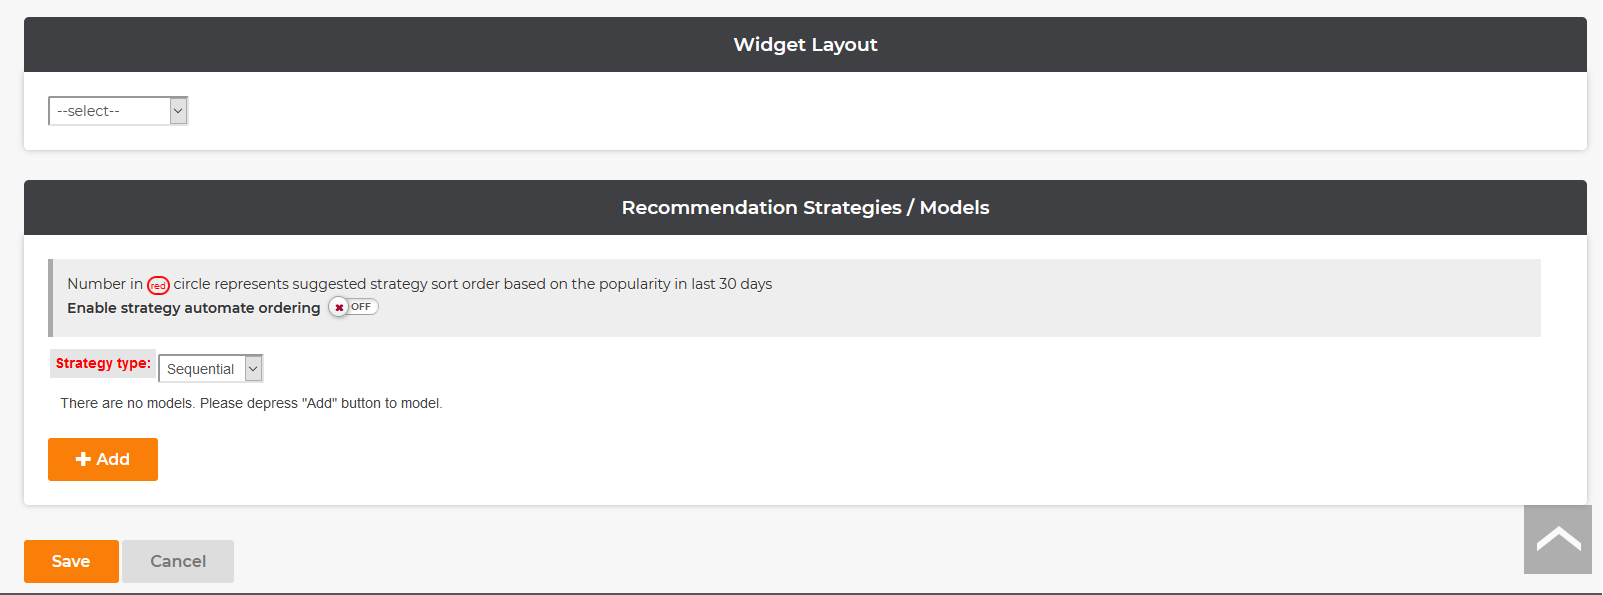
Once you have completed all changes click the "save" button. Remember that the widget will not be rendered on site end until the corresponding div is placed onto the page.
Updated about 2 months ago